

How To Repair Hunter Douglas Duette Honeycomb Shades
How to Replace Elevator Tape in a Hunter Douglas EasyRise Cellular Shade
Introduction
Sometimes the flat elevator tape within a honeycomb shade can become damaged or break. This guide walks you through the steps to remove and supervene upon elevator tape on a Hunter Douglas brand EasyRise cellular honeycomb shade.
A Note on Safety
Kids tin strangle in blind cords. To brand your blinds safer for kids, go along cords out of reach and secure cord and dewdrop concatenation loops. To larn more, delight visit our child safety guide.
Tools Needed

Flat-caput Screwdriver
Scissors
Articulate Record
Rubber Bands
Parts Needed
Step i – Remove the shade from the window.

Step 2 – Employ rubber bands to go on the shade compressed.
- Place i safety band around each cease of the shade.
Step three – Remove the buckles from the pockets in the bottom rail.
Step iv – Remove the elevator record from the buckles.
Pace five – Remove the shaft servant from the bulldoze shaft.
- Y'all may demand to utilise a flathead screwdriver to pry the shaft servant loose.
Step half-dozen – Slide the clutch out of the headrail.
Step 7 – Slide the drive shaft out of the open finish on the headrail.
Step 8 – Remove the lift tape spools from the headrail.

- The spools can be removed by gently twisting them inside the headrail.
Step 9 – Remove any lift record that is attached to the spools.

- A flathead screwdriver tin can be useful in removing the record.
Step 10 – Cutting a piece of replacement lift tape for each elevator tape spool.

- The length of each piece of elevator record should exist the length of the shade plus 12".
Stride 11 – Thread the tape upward through the shade fabric starting at the pockets in the bottom rail.

- Employ the 1.2mm restring needle for this step.
- It is very important to avert twisting the record when you are threading the tape through the shade.
Step 12 – Rotate the lift tape spool so that the slotted tab is at the i o'clock position.

Step 13 – Thread the lift tape through the lesser of the lift tape spool through the slotted tab.
Footstep xiv – Push the terminate of the elevator tape back through the slotted tab leaving a large loop.
Step xv – Push button the stop of the lift tape underneath the section of lift tape coming upwardly the long slot.
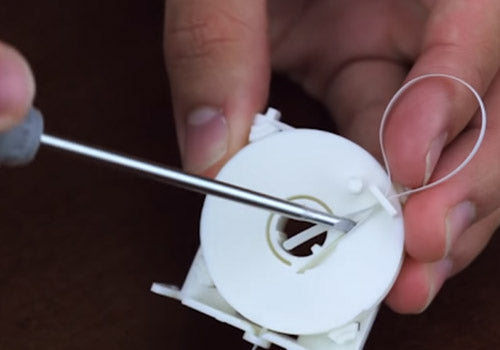
- This is easy to practise if you enhance the tape slightly with a flat head screwdriver.
Step 16 – Pull the looped department of the elevator tape around the pin.

- Pull on the lift tape where it comes out of the bottom of the lift tape spool to make sure that information technology does not slip.
Pace 17 – Install the lift tape spools into the headrail.

- Gently twist the lift tape spools into place in the headrail to lock them in place.
Stride xviii – Pull the record from the lesser rail.
- All the spools should be fully unwound and the slotted groove should be at the i o'clock position.
Step xix – Insert the drive shaft through the lift tape spools.

- At that place is one groove on the drive shaft that is slightly deeper than the other 2 grooves. Make certain that the deeper groove lines up with the largest notch on the inside of the lift tape spools.
Stride 20 – Install the clutch associates.

- Make sure the notches are lined up correctly with the grooves on the drive shaft.
Stride 21 – Reattach the shaft retainer to the bulldoze shaft on the clutch side of the spool associates.
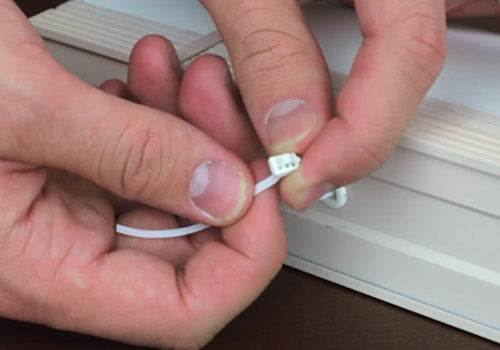
Step 22 – Thread the tape through the buckles.

- Go out the extra tape hanging from the lesser.
Step 23 – With the rubber bands still on the shade, remount the shade in the window.

Step 24 – While holding the bottom rail, cut the rubber bands off of the shade.
Footstep 25 – Lower the shade slowly by hand to the bottom of the window.
- It is important to make sure that the tape is not being twisted.
Step 26 – If necessary, adjust the location of the buckles on the lift tape.

- This allows you lot to enhance or lower the bottom rail of the shade so it hangs evenly exactly where needed.
Stride 27 – Finish threading the tape in the buckles to lock information technology in place.

Step 28 – Insert the buckles into the pockets making sure they are seated tightly.
- Trim the backlog tape leaving i" of tape hanging from the pocket.
Step 29 – Record down the lift tape to the bottom rail.

Step 30 – Test the repair by raising and lowering the shade.
Source: https://fixmyblinds.com/pages/how-to-replace-lift-tape-in-a-hunter-douglas-easyrise-cellular-shade/
0 Response to "How To Repair Hunter Douglas Duette Honeycomb Shades"
Post a Comment